
What you need to know:
The Business Integrator client integrates your Consolidated ProConnect service with a variety of business applications to provide a more effective and intuitive work environment for your team.
MENU

Introduction
Business Integrator connects your ProConnect service to the business applications your team already uses, bringing call control and contact information into one place. This guide covers download and sign-in, the interface, your configuration options, and day-to-day call and contact tasks.
1.
Download and Sign In
Business Integrator integrates your ProConnect service with a variety of business applications to provide a more effective and intuitive work environment for your team.
To download Business Integrator:
- Go to the following URL: https://proconnect.fidium.com/downloads_n_links/
- Find the Business Integrator option and click Download. Then, click the file to begin downloading.
- Review the End-User License Agreement, check I agree to the license terms and conditions, then click Install.
- When the installation completes, click Launch.
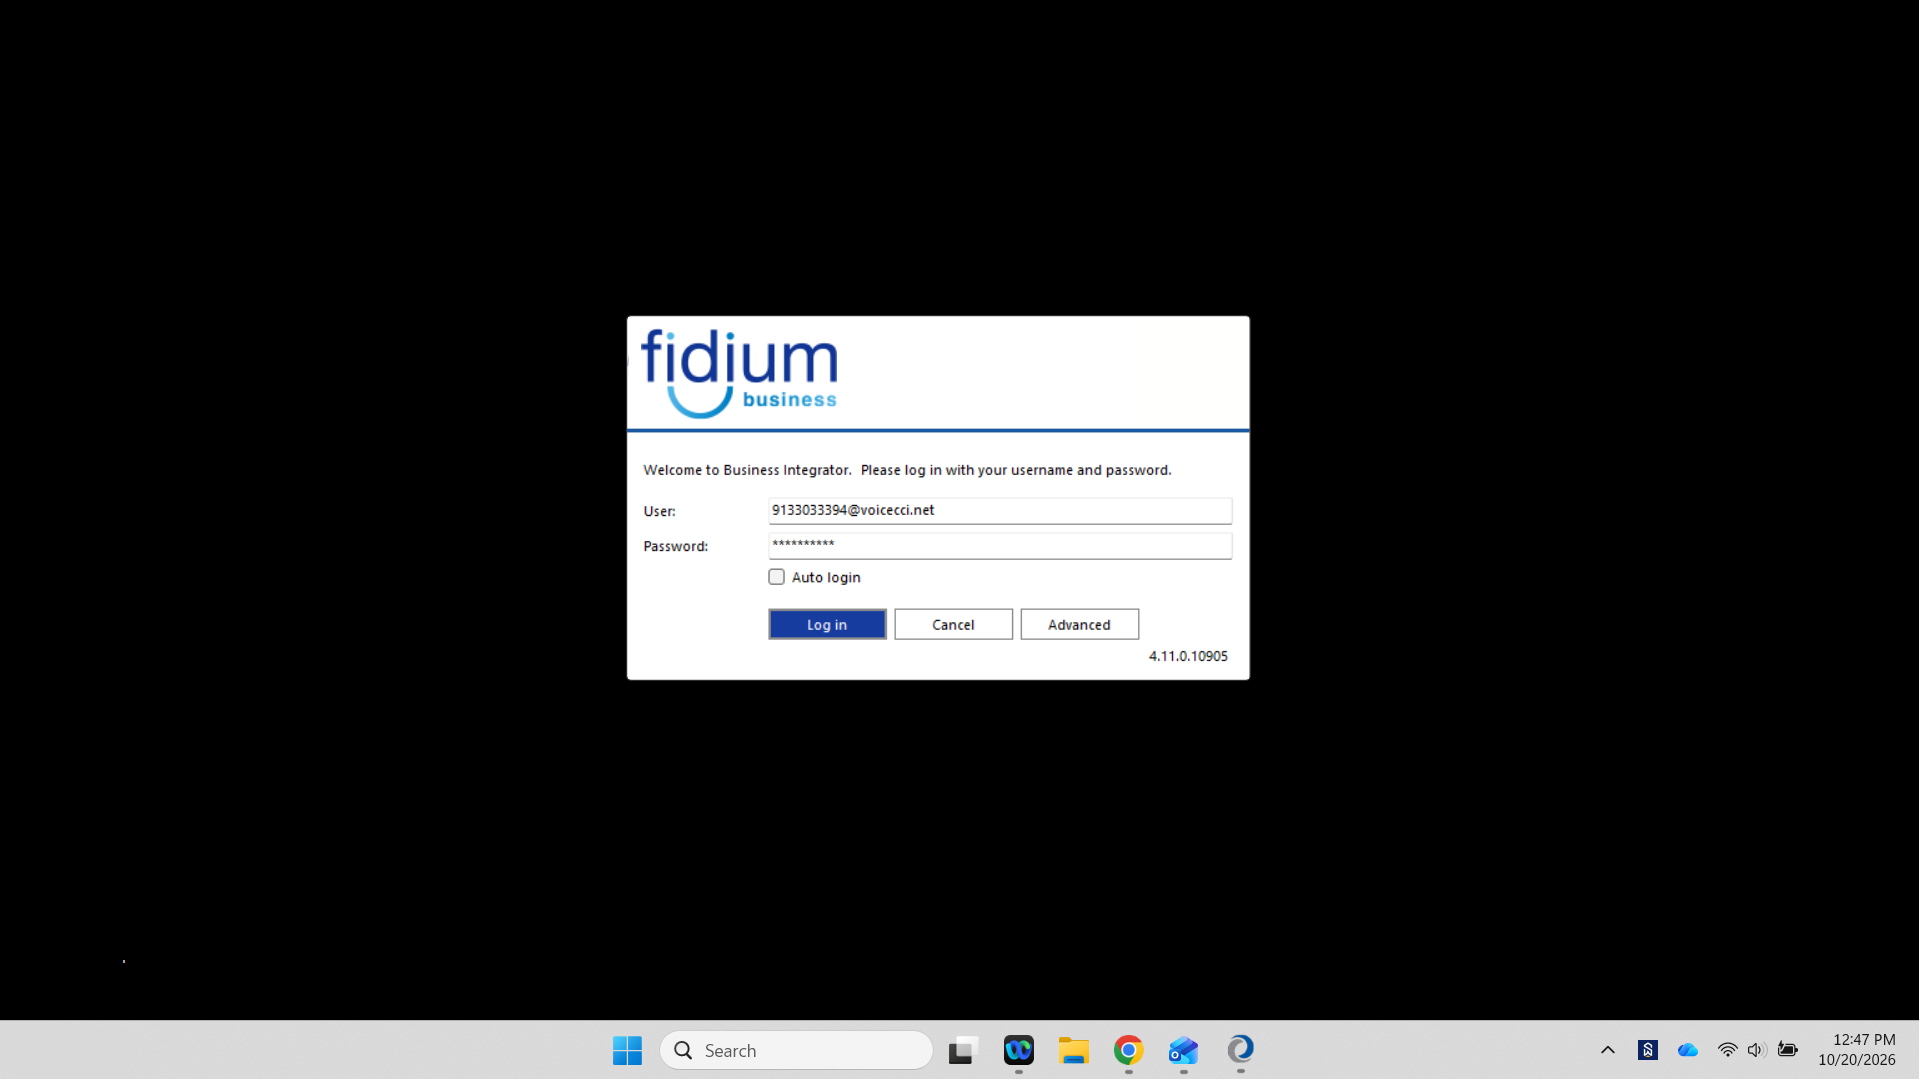
To log in to Business Integrator:
- Enter the Access Code and click OK.
- Click Log in.
- Enter your Username and Password.
- Click Log in.
 Click image for large view
2.
Interface Overview
Business Integrator runs quietly in your system tray and surfaces call information when you need it, without interrupting your work.
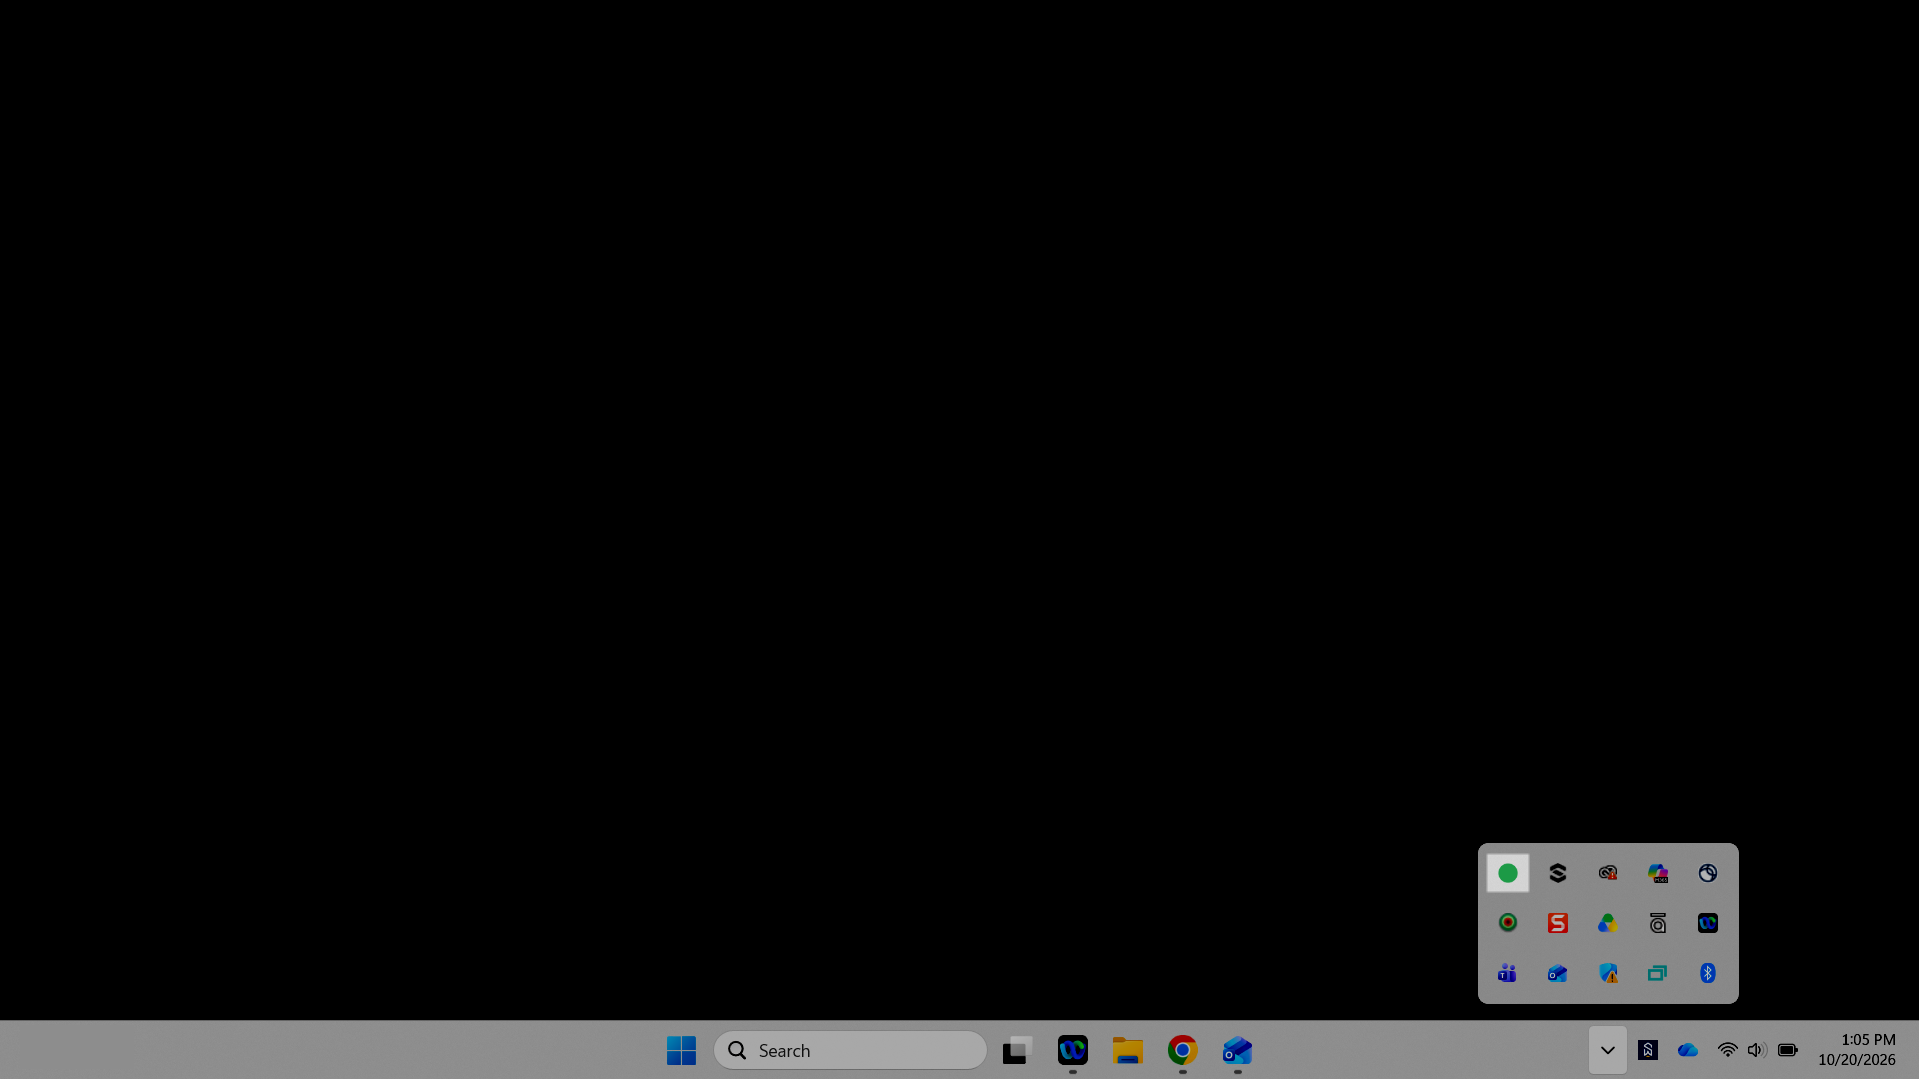
To open Business Integrator, access your computer’s tray menu and right-click the circle icon.
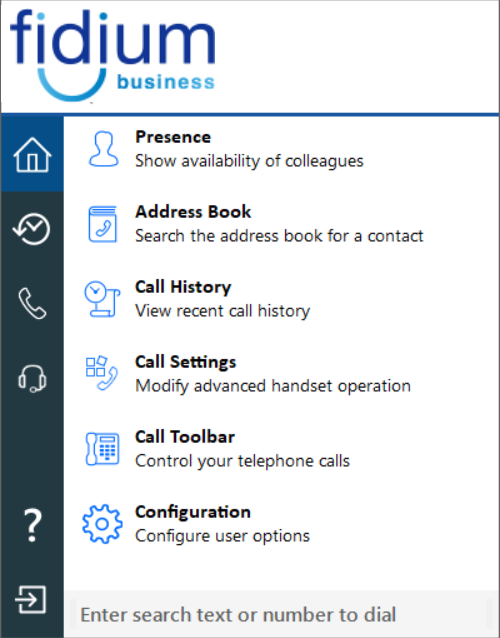
Click image for large viewThe following items are common tools used within Business Integrator:
- Home – Brings you to the main screen of Business Integrator. Here you can access the following items:
- Presence: Shows and updates the availability of your colleagues.
- Address Book: Search your address book for a contact (personal, shared, or organization-wide) across your integrated CRMs.
- Call History: Access, view, and manage calls and contacts within call history.
- Call Settings: Allows for the configuration of specific calling features.
- Call Toolbar: Manage active calls, launch new calls, and access call center features — all from a convenient docked toolbar.
- Configuration: Opens settings for interface, dialing, devices, CRM integrations, sounds, and more.
- Recent Calls – Shows your recent calls and provides access to your full call history.
- Make a call – Dial a number and choose which device to place the call from.
- Call Center – If configured, manage your Agent State and Queue availability.
- Help – Access help documentation for frequently asked questions.
- Search and dial – Quickly looks across multiple address books using a first name, last name, company name, or phone number.
- Exit – You have the following options when exiting:
- Change your password
- Log out – Log out of your current account.
- Exit Business Integrator – Closes the desktop client.
Click image for large view3.
Customize Your Interface
Business Integrator gives you the flexibility to tailor your experience to match the way you work.
To customize your interface:
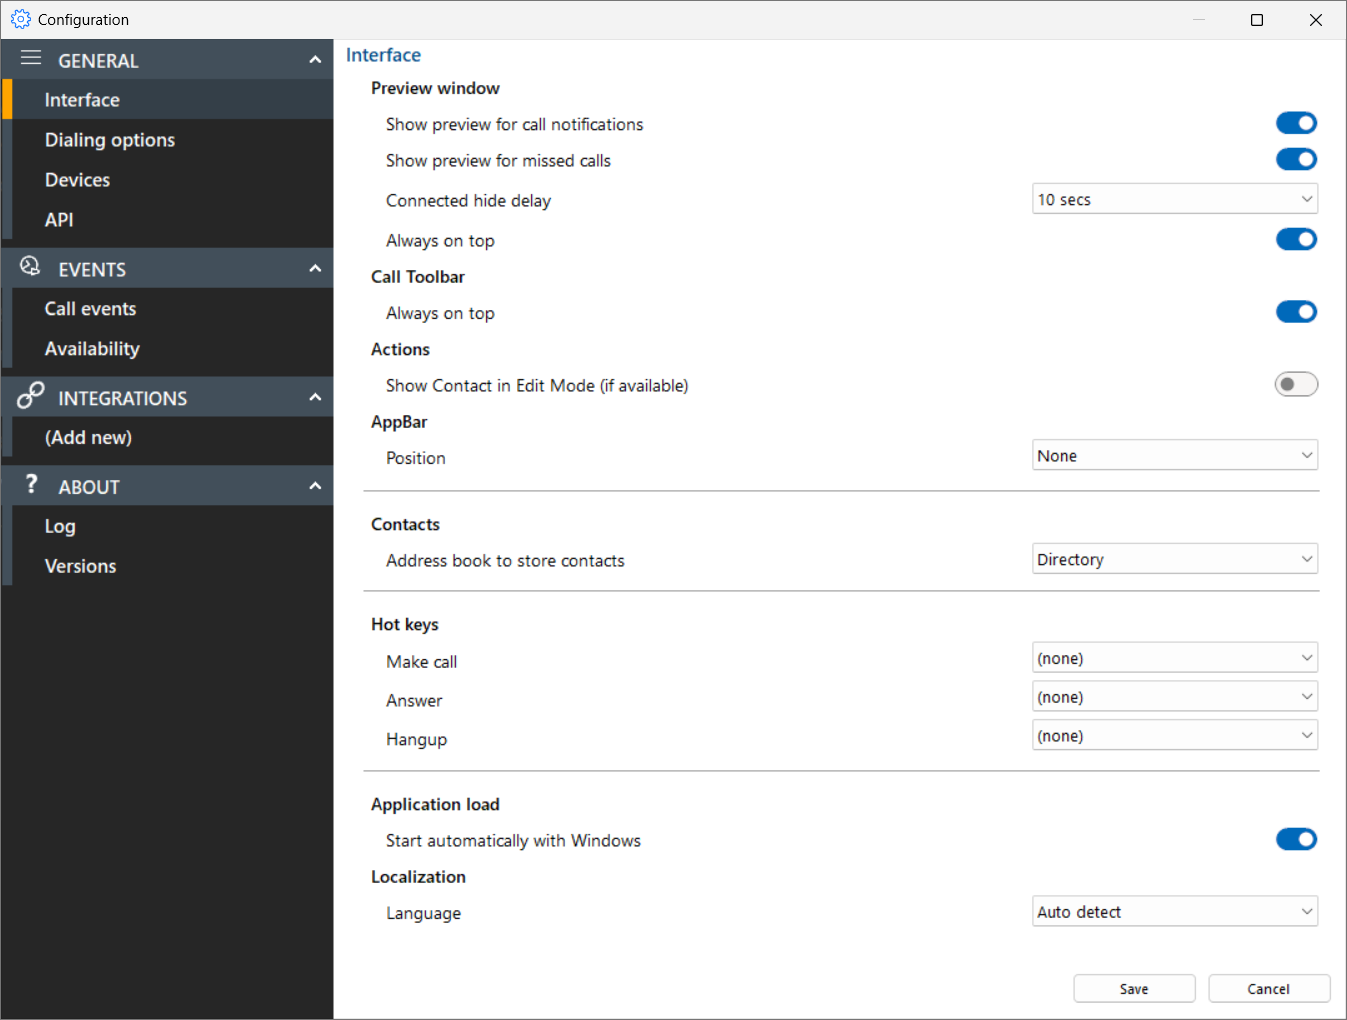
- Go to Configuration and select Interface. The following settings are commonly modified:
- Preview window – Shows call details and controls when a call starts, plus options like viewing contact info or logging activity, depending on your settings. It closes after 10 seconds; hover over the tray icon to reopen it.
- Call Toolbar – Docks to the top or bottom of your screen and offers quick access to key features like call handling, call previews, and call center tools.
- Actions – If enabled, contacts automatically open in edit mode.
- AppBar – Determines the position of the AppBar; set it to None to use Tray Mode.
- Contacts – Choose which address book contacts default to store in.
- Hot keys – Assign a keystroke or function key to make, answer, or hang up a call.
- Application load – Enable Business Integrator to start automatically with your desktop.
- Click Save to save your changes.
Click image for large view4.
Set Dialing Preferences
Business Integrator gives you the flexibility to place calls the way you work.
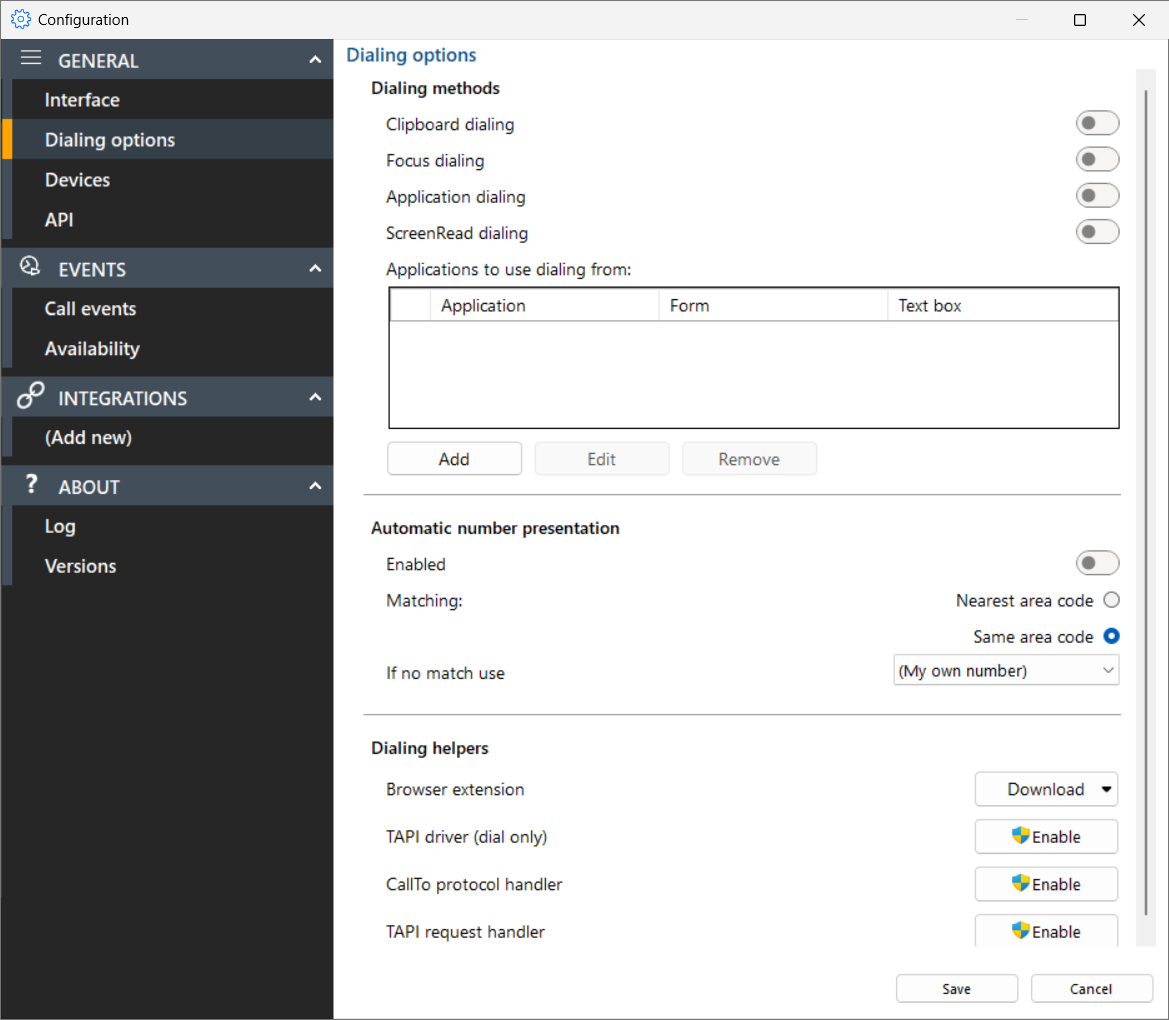
To set your dialing preferences, go to Configuration and select Dialing options. The following dialing options can be modified:
- Dialing methods – Set your preferred method when making an outbound call. Options include:
- Clipboard dialing: Quick dial by copying the number to your clipboard and using the call button to place the outbound call.
- Focus dialing: In compatible applications, use the dialing icon to place an outbound call.
- Application dialing: Hover over a valid number and click the dial icon to place an outbound call.
- ScreenRead dialing: Uses image analysis to dial valid telephone numbers.
- Automatic number presentation – When enabled, Business Integrator shows the recipient a caller ID that matches their area code (or the nearest one), and uses your own number if there is no match.
- Dialing helpers – Allow you to enable a variety of extension or traditional telephony dialing interfaces. Options include:
- Browser extension: Install your preferred web-browser extension and use click-to-dial functionality to place a call directly from your web browser.
- Traditional telephony drivers: Refer to the manual of your TAPI-enabled application for information on enabling TAPI driver (dial only), CallTo protocol handler, and TAPI request handler.
Note: Dialing methods vary by application type. Not all CRM integrations support all dialing types. To use Application dialing, you must configure compatible applications in the Application Dialing Wizard.
Click image for large view5.
Connect a CRM
Connecting a CRM lets Business Integrator match calls to your customer records, so contact details and call activity stay in one place.
The following prerequisites are important to note before connecting a CRM, and may vary slightly depending on the CRM:
- Install and configure the Business Integrator client.
- Ensure the CRM is configured and working.
- Have any CRM credentials or required information ready to go.
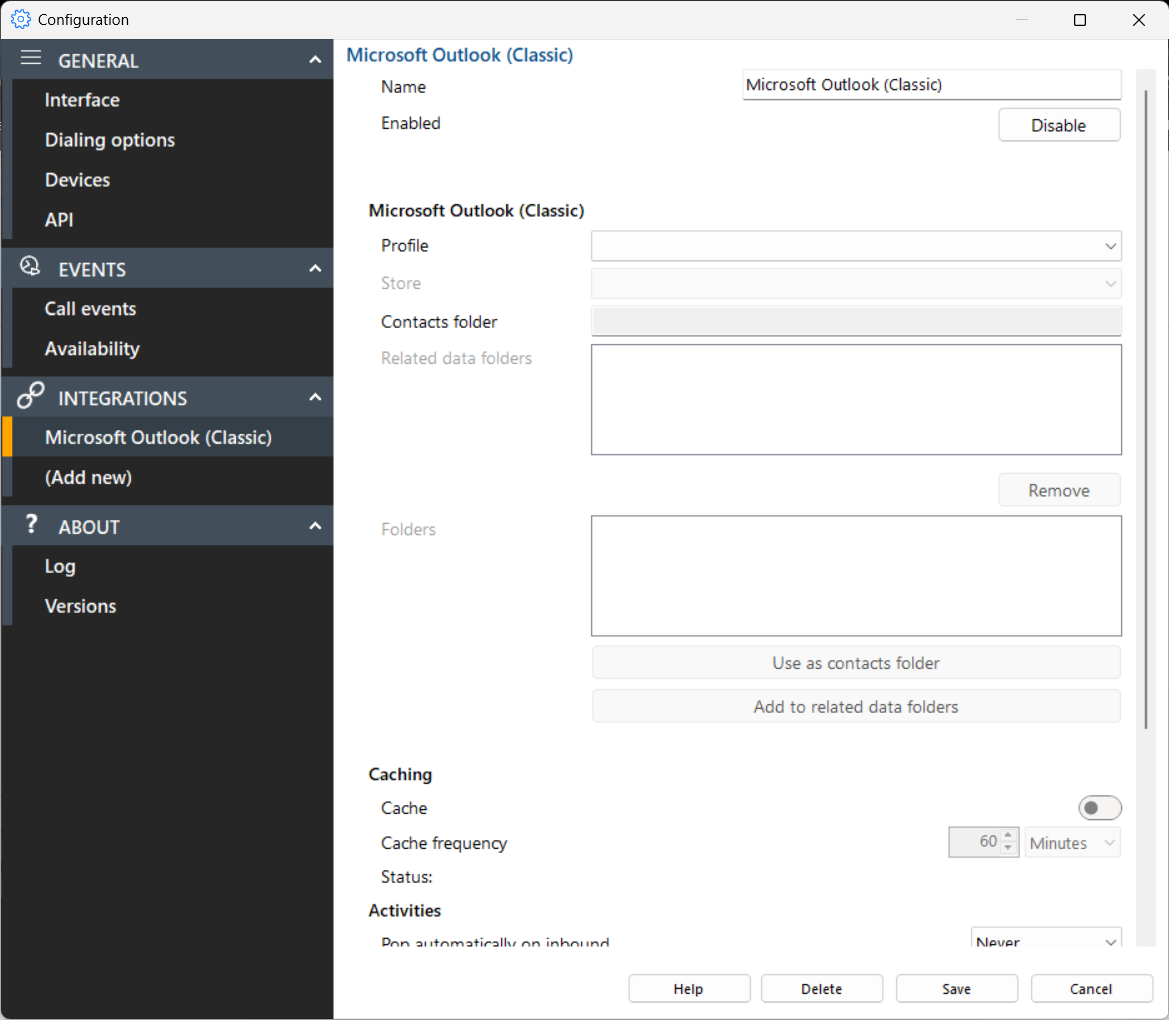
To connect a CRM:
- Go to Configuration.
- Under Integrations, click Add new.
- Choose your CRM from the dropdown, and click Set.
- Enter the required details.
- Click Save.
Note: For setup details specific to your CRM, click Help.
Click image for large view6.
Make a Call
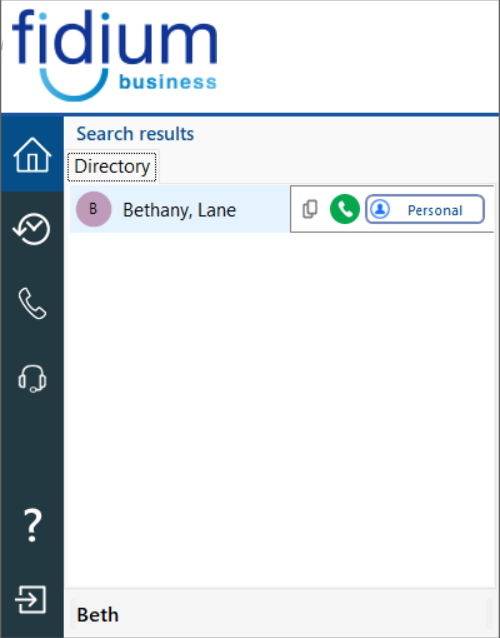
Making calls with Business Integrator is simple, keeping communication fast and efficient. Find contacts and dial numbers from all your connected address books in one search bar in the tray menu.
- Use the Search field to search for your desired contact by telephone number, name (first or last), or company. Contacts from all integrated address books and CRMs that match the criteria populate.
- Hover over the desired contact to view the contact details or to place a call.
- Click the Call icon.
The outgoing call is placed. You can view any contact notes, launch their contact information in a connected address book or CRM, and use the available call control settings.
Click image for large view7.
Use Call Control Features
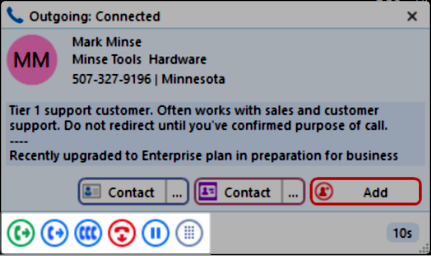
The Preview Window provides access to various actions and controls during an active call. While on an active call, several controls appear in the interface:
- Consult – Consult with an extension or dialed number.
- Transfer – Complete a blind transfer to another number or extension.
- Conference – Conference in a third party.
- Hold – Place an active call on hold.
- Resume – Resume a held call.
- End call – Ends the active call.
Note: The available options may differ depending on the device in use and any integrated address book or business CRM systems.
Click image for large view8.
View Call History and Recent Calls
Call history and recent calls provide an easy way to review and manage your recent communications. You can quickly view, redial, or take action on recent inbound, outbound, and missed calls.
Select Recent Calls to see a list of your most recent calls.
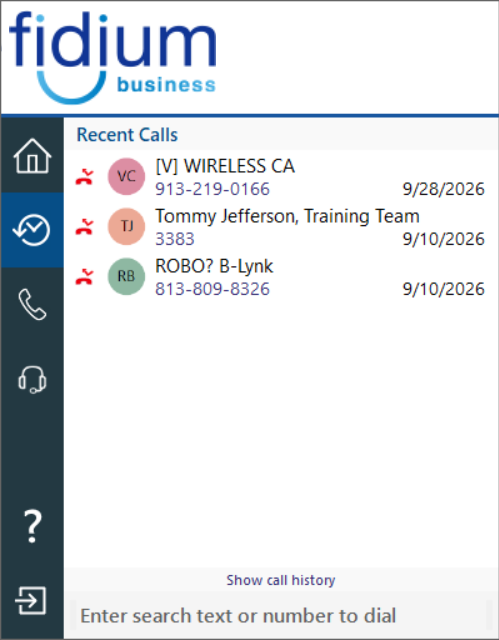
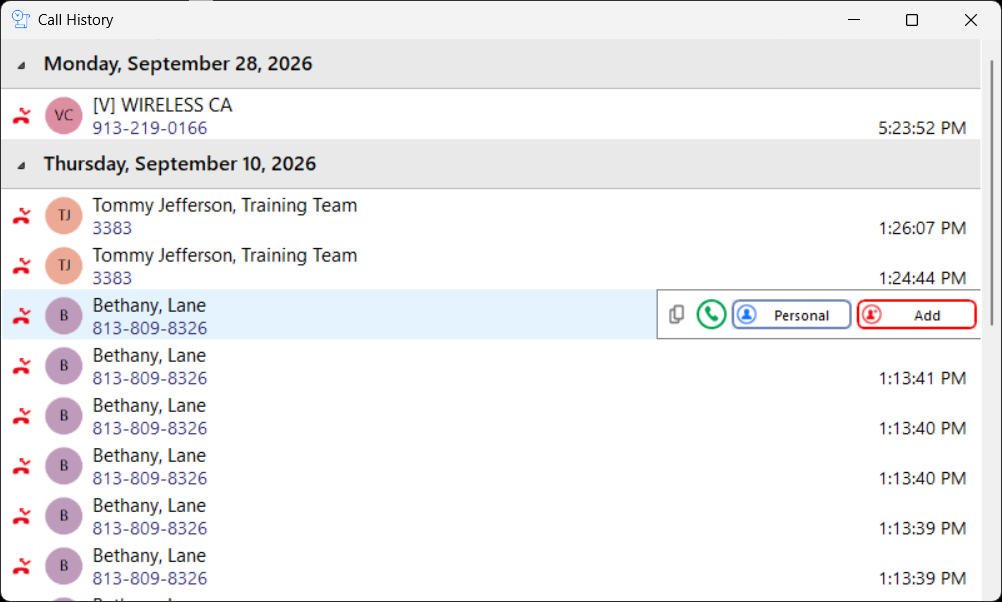
Click image for large viewClick Show call history to view a more complete call history. Call history holds up to 50 of your most recent calls for quick reference. Hover over any call for additional options.
- Click Make call to quickly redial the number.
- Click the ellipsis to access additional contact options.
- Use the Add function to write new contact details into enabled address books or CRMs, to create additional entries for known contact numbers, or to copy contact records between different address books and CRMs.
Click image for large view9.
Add a Contact During an Active Call
You can quickly add a caller’s information to an integrated address book or CRM during an active call.
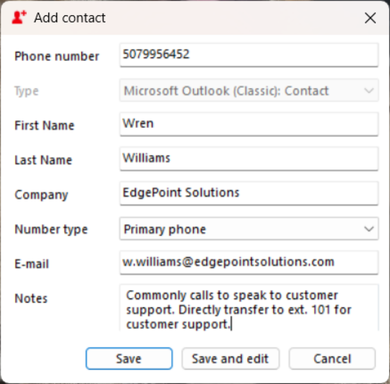
To add a contact during an active call:
- Click Add Contact to save a number not already in your address book or CRM.
- Select the Type to choose which integrated address book or CRM you would like to add the contact to.
- Modify the First Name and Last Name fields.
- Enter the Company name, if desired and applicable.
- Enter an E-mail address.
- Enter any applicable contact Notes.
- Click Save, or Save and edit to open the contact within the selected address book or CRM.
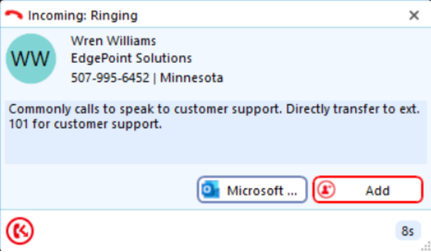
Click image for large viewAfter saving the new contact, the Preview window automatically updates with the contact details if the call is still active.
Click image for large view10.
Search for Contacts and Filter Records
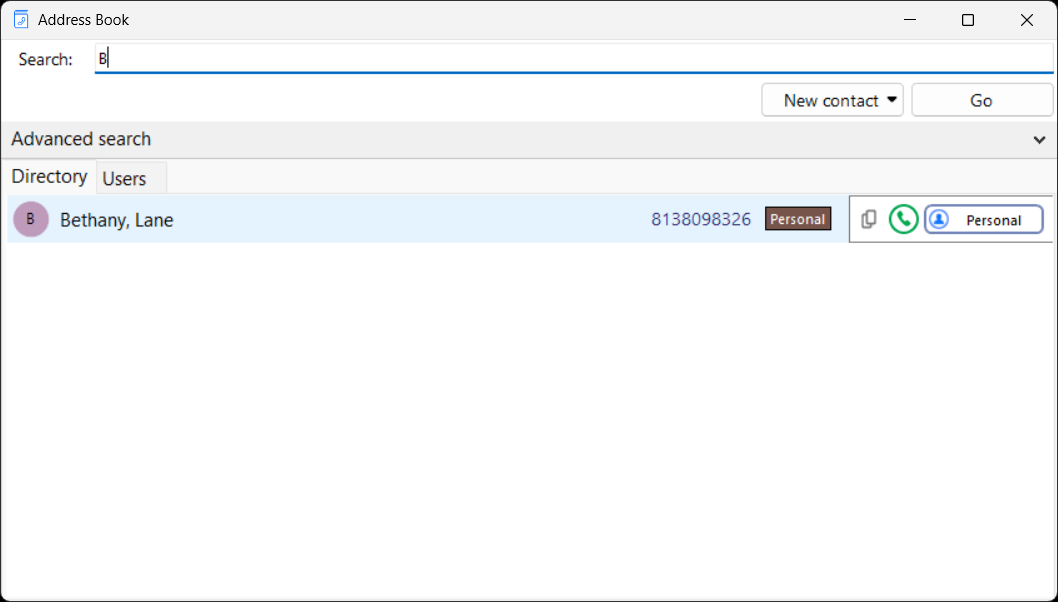
The address book provides a centralized way to access and manage your contact records, letting you quickly search and filter contacts across integrated systems.
To search for a contact:
- Click Address Book.
- In the Search field, enter your search criteria. You can search by contact name, telephone number, or company.
- Click Go. Any matching records across all integrated address books and CRMs populate.
- Hover over the desired contact record to make a call or view their contact details within the applicable address book or CRM.
Click image for large view